

Shopify Ad Tracking: Which Ads Actually Drive Your Sales?
Connect Shopify purchases with ad spend, follow the checkout funnel, and use attributed revenue to make better campaign decisions in Skro.
sales revenue ÷ ad spendIn this article
Your Shopify store had a good weekend. Orders came in, the ads kept running, and Monday's sales total looks healthy. Now you have another €500 to spend. Which campaign should get it?
The store total won't answer that question. You need to connect the purchases to the advertising that brought those customers in, then put the revenue beside what you paid to acquire it.
That's the job of Shopify ad tracking. A useful setup lets you follow a visit through the store, see the outcomes attributed to a campaign, and decide where the next euro has a reasonable chance of paying off.
What needs to connect between an ad and an order?
Start with three pieces of information: where the visitor came from, what happened in the store, and what that traffic cost.
An ad click brings campaign information to your website. A tracking identifier connects that visit with later events. Shopify supplies the store activity, while an integrated traffic source supplies advertising cost. Your campaign report brings those pieces together.
For a paid purchase, the journey you want to verify looks like this:
Ad click → tracked store visit → checkout → order event
                         ↓
          Campaign + attributed revenue + ad spend
The order number and tracking identifier have different jobs. The order number identifies the transaction in your store. The click ID identifies the tracked visit to which an event belongs. Keep both available when investigating a purchase; an order without its original tracking connection can still be a valid sale, but it may be unattributed in your campaign report.
Track the steps that explain the purchase
Purchase is the event you'll usually care about most. The earlier steps help explain why one campaign reaches that outcome more often than another.
Skro's Shopify guide covers these events:
| Event | What it helps you investigate |
|---|---|
| PageView | Whether tracked visitors are reaching the store. |
| ViewContent | Whether they are viewing products. |
| AddToCart | Whether product interest is turning into shopping intent. |
| InitiateCheckout | Whether shoppers are moving toward an order. |
| Purchase | Which order events and revenue are reaching the report. |
These events arrive through different parts of the integration. The documented Skro setup uses Shopify webhooks for checkout and order creation, with custom pixels for additional browser events. Connecting the order webhook alone doesn't give you every step in the table.
There is also a business distinction to settle before you label the results as sales: an order being created isn't necessarily the same as payment being captured. Shopify manages payment and fulfillment as separate parts of the order process. If your store accepts manual payments or delayed payment methods, compare the reported order event with the payment status you actually use to recognize revenue. Shopify's order-management documentation explains those stages.
Keep cart value out of sales revenue
Suppose a shopper adds €90 of products to a cart, starts checkout, and completes a €90 order. You have several useful events, but the customer has bought €90 of goods.
If you include the cart value, checkout value, and purchase value in the same headline revenue total, the report can make that journey look much more valuable than it was.
In Skro, Custom Conversions let you choose which events contribute to conversion and revenue columns. Keep the early funnel steps available for analysis, then configure the purchase event to contribute to the sales total you intend to measure. Event names alone don't make that reporting choice for you.
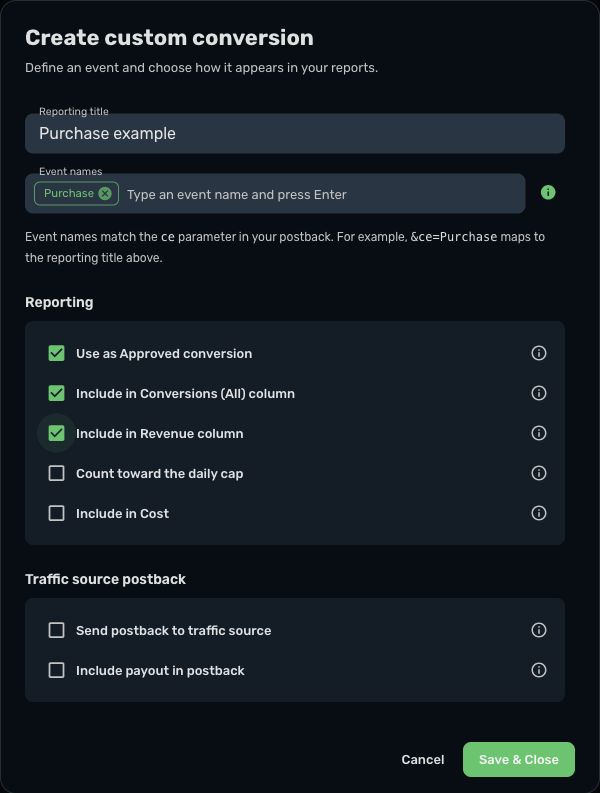
The Custom Conversions guide explains these settings. Check them before your first campaign review; an inflated revenue column makes every decision downstream harder.
Follow the tracking connection through the store
Campaign names and UTM parameters make reports easier to read. They don't replace the identifier used to match a conversion with its tracked visit.
Skro's Shopify setup passes a click ID into the store and uses the configured tracking scripts and integration to connect subsequent events. Use the campaign links and tracking method generated for your setup. When you change a destination, add a landing page, or introduce a new checkout flow, test that journey again.
A useful test is very specific: can you find the visit, complete an order through that same journey, and see the expected event and value attributed to the campaign? A script appearing in the page source is only one part of that test.
Browser restrictions and customer privacy choices can affect what is available to track. Server callbacks still depend on a preserved connection to the visit; they don't recover an identifier that never reached the order flow. A person switching devices may also break a connection that works on one browser. Build your checks around the journeys your customers actually take, and respect the consent settings required for your store.
Worked example: ten orders each, two different decisions
Imagine two campaigns advertising the same products over the same completed reporting period. These are illustrative figures, not customer results. Assume each campaign has ten distinct attributed purchase events, an average order value of €100, and complete advertising costs.
| Metric | Campaign A | Campaign B |
|---|---|---|
| Advertising cost | €400 | €600 |
| Attributed purchases | 10 | 10 |
| Attributed purchase revenue | €1,000 | €1,000 |
| Cost per purchase | €40 | €60 |
| ROAS | 2.5× | 1.67× |
Looking only at orders, the campaigns seem equally useful. Connecting cost changes the picture: Campaign B paid €200 more to generate the same attributed revenue.
Now assume that goods, fulfillment, and payment fees leave 60% of sales revenue available before advertising. Each campaign's €1,000 of sales leaves €600 to cover ads. Campaign A has €200 left after advertising; Campaign B has nothing left under that simplified calculation. Neither figure includes fixed overhead or costs outside those assumptions.
That makes Campaign A the more promising place to investigate further. It doesn't prove you can double its budget and keep the same results. Check the product mix, sample size, and a longer period before making a large change. Our ROAS and ROI article explains how to put those ratios in context.
Use the funnel to decide what to investigate
Once cost and purchase revenue are connected, work backward through the events.
If a campaign brings product views but few carts, review the match between the ad, product, price, and audience. If carts are healthy but orders are weak, walk through checkout yourself. Shipping charges, payment choices, mobile usability, or an unexpected discount restriction may explain the gap. Missing tracking can produce a similar pattern, so confirm the events before changing the store.
Event totals are not automatically a sequence of unique shoppers. One customer can view several products or add multiple items to a cart. Compare the same reporting scope, and use event counts as clues rather than treating every ratio as a person-by-person funnel.
Where Skro fits alongside Shopify and your ad platforms
Shopify remains where you check the order and its payment status. Your ad platforms remain where ads are delivered. Skro gives you a campaign view that connects tracked outcomes with advertising cost and lets you compare performance across your connected traffic sources.
The Shopify integration supports Custom Conversions and attributed revenue reporting. The guide also covers sending supported events to Meta and TikTok, and configuring a separate organic campaign. Those are separate setup choices: connecting the store doesn't automatically configure every outgoing event or organic visit.
You can use Skro Ads Manager to review and manage supported advertising entities. The available controls depend on the traffic-source integration. For this Shopify workflow, start by getting the incoming purchase and revenue right before adding more campaign controls or conversion feedback.
Expect some differences between reports. Shopify itself recommends aligning the attribution model, date range, and traffic type when comparing marketing figures. Its marketing-performance documentation also explains reporting delays and differences from other platforms. Compare the same outcomes rather than adding each platform's claimed sales together.
Start with one campaign and one verified order
Before rolling tracking out across the whole account, use a controlled campaign and Shopify's supported test-order workflow. Check the visit, the checkout event, the order event, the reported value and currency, and the campaign receiving the credit. Confirm that cart and checkout values haven't been added to sales revenue.
Then compare the result with the store record. Include payment status and your revenue definition in that comparison. If you also send the conversion to an ad platform, verify receipt there separately.
Follow the Shopify integration guide for the configuration. Once that first journey is verified, your next budget decision can start with a much better question: how much attributed revenue did this campaign generate for what it cost?