# TikTok integration
Source: https://skro.eu/docs/integrations/tiktok-integration
Set up TikTok tracking in Skro, configure traffic source parameters, and connect your advertising campaigns.
[TikTok](https://tiktok.com) integration gives you the ability to manage and optimize all your ads through the Skro UI.
- Send conversions to TikTok to feed their AI and optimize audiences.
- Sync ad spend every 30 minutes to Skro, so you get accurate reporting.
- Check the delivery status and manage the status of Campaigns, Ad Groups and Ads directly from Skro UI.
- Change Daily Budget directly from Skro UI.
- Import dynamic columns like CPM, Link CPC, Link CTR, Impressions, Link EPC and Link Clicks from TikTok to Skro.
In this guide, you will learn how to set up your campaigns in TikTok and Skro so TikTok can pass information to Skro and back with a selected tracking method. This guide does not cover all aspects and options available when creating a campaign on these two platforms. Basic knowledge regarding setting up campaigns in TikTok and Skro is required.

## Step 1. Set up TikTok integration [#step-1-set-up-tiktok-integration]
1. Log in to your **Skro** account.
2. Navigate to **Settings** → **Integrations**.
3. In the **Traffic Sources** section click **Add**.

4. Click **TikTok** logo and you will be redirected to TikTok Ads.

5. Sign in to the account you want to integrate.
6. Review the requested permissions.
7. Click **Confirm** and you will be redirected back to Skro.

8. Choose the TikTok ad account you want to integrate. If you have multiple ad accounts, you need to integrate them separately.
9.Click **Next**.

## Step 2. Set up Conversion API [#step-2-set-up-conversion-api]
1. If you want to send conversion info back to TikTok, then you will need to enable **Conversion API.**
**TikTok Conversion Events**
1. **Conversion Event Name** - Define all your events that you want to track with CAPI (CompleteRegistration, CompletePayment, Subscribe etc.). When creating a campaign in Skro, then you will need to specify which conversion event you want to track. (If you want to track multiple events, then you will need to use our Custom Conversions and fire the pixel where needed. For example: AddToCart, ViewContent etc.).
2. **Include Conversion Payout** - If checked, we will send conversion revenue and currency to TikTok.
**Facebook Pixels**
1. **Pixel Name** - Just give a name to your pixel.
2. **Pixel ID** - Your TikTok pixel ID what you are going to use when creating a campaign in TikTok and Skro. Go to TikTok Ads Manager and click **Tools** → **Events** → **Web Events** and copy your pixel ID. For example IDCM7EMDJC77UVR5LM77GO
3. **Conversion API Access Token** - Go to TikTok Ads Manager and click **Tools** → **Events** → **Web Events** Select your pixel and go to **Settings**. Scroll down and you will see **Events API** section. Click **Generate Access Token**.
2. Copy and paste that token into Skro.
3. Click **Save & Close**.

Your **TikTok** ad account has been successfully integrated.
- You can turn on/off your cost sync.
- Edit, delete or renew your integration access token.
- Renewing your access token is needed because sometimes TikTok will revoke your access token for some reason and your cost sync will not work.

## Step 3. Associate the integration with your traffic source. [#step-3-associate-the-integration-with-your-traffic-source]
1. Navigate to the **Traffic Sources** and click **Create**.

2. Click **TikTok** logo.

3. Choose and select your TikTok integration from dropdown menu.

4. All parameters are already prefilled for you.
5. Click **Save & Close**.
The integration is ready. Continue by creating a campaign for TikTok.
## Step 4. How to create a Campaign in Skro [#step-4-how-to-create-a-campaign-in-skro]
### (OPTIONAL) Add your landing page as (pre-lander) before your actual offer page. [#optional-add-your-landing-page-as-pre-lander-before-your-actual-offer-page]
1. Go to **Landings** and click **Create**.
2. Select workspace.
3. Add name.
4. Add your landing page URL and macros if needed.
5. Copy **Click to Offer URL** and add it to your landing page as CTA link.
6. Click **Save & Close**.

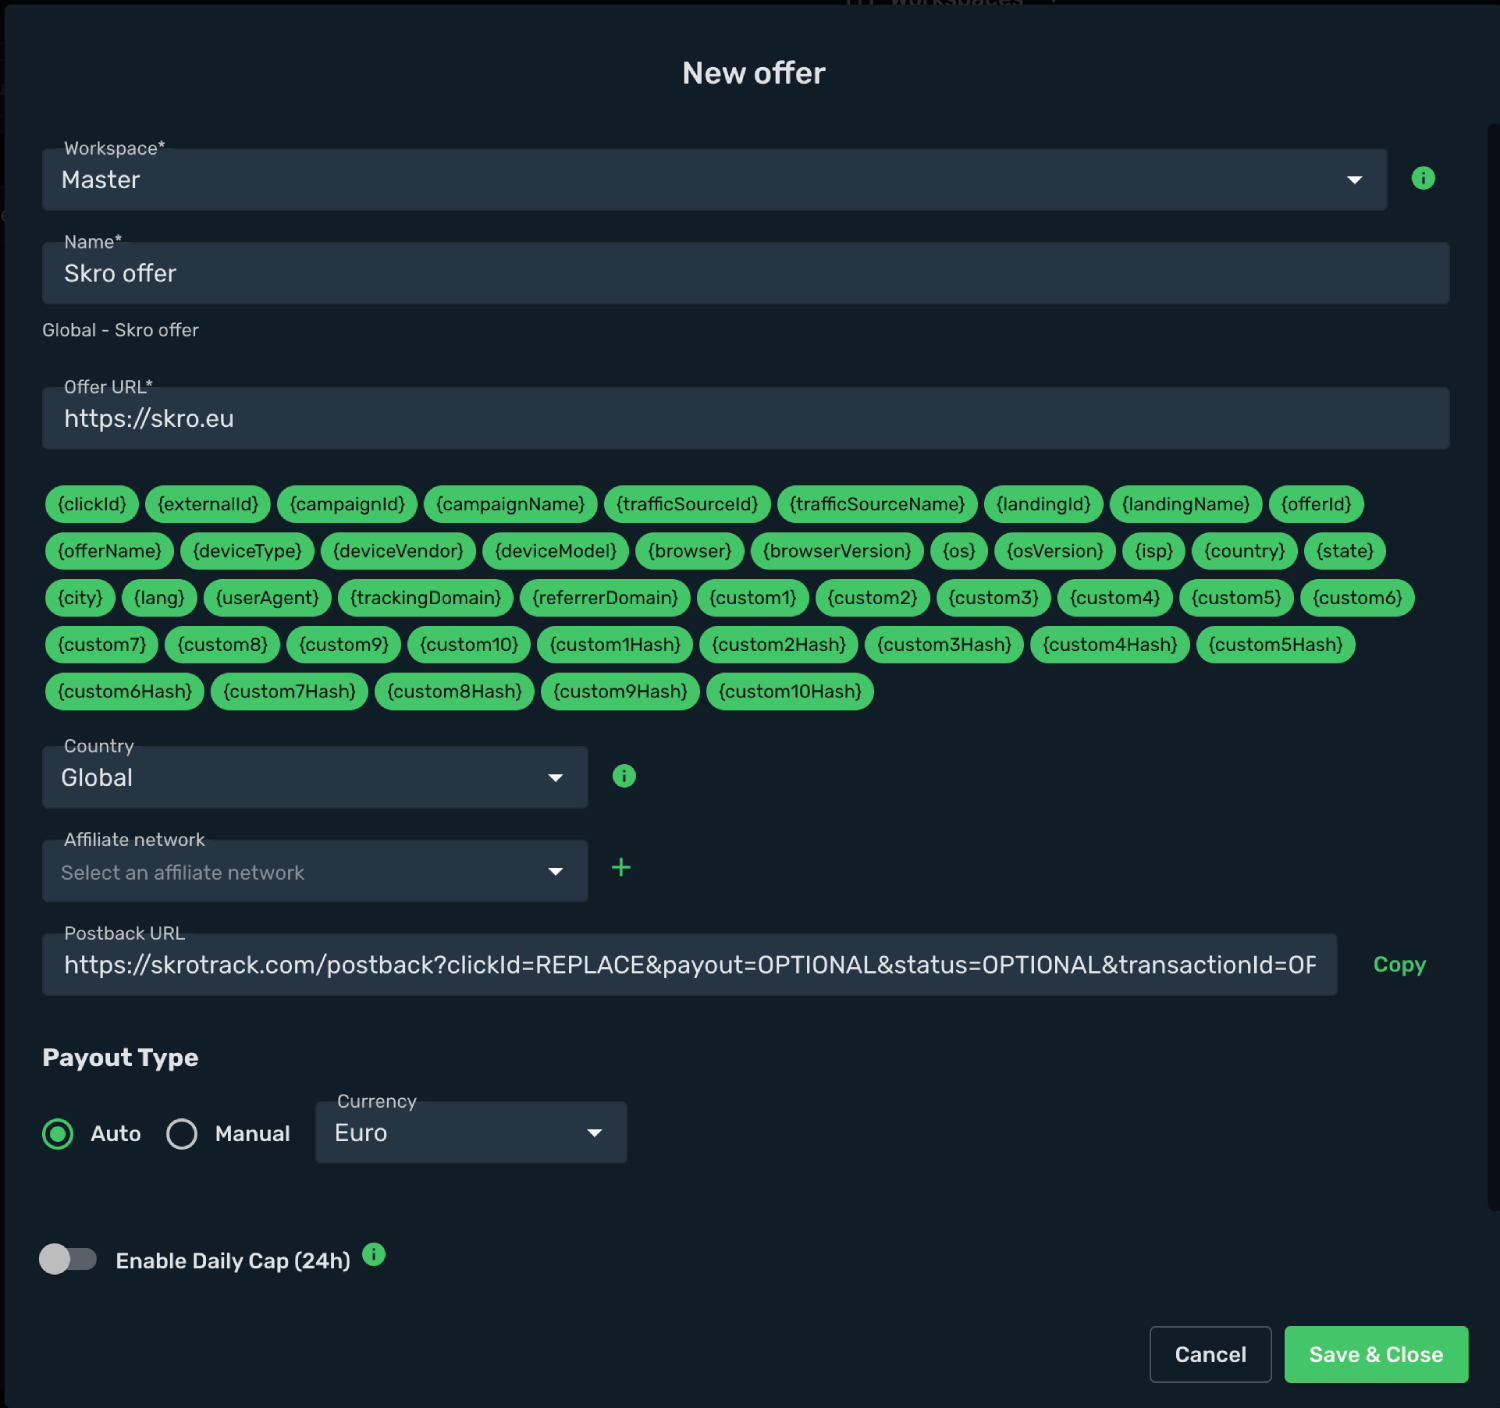
### Add offer page. [#add-offer-page]
1. Navigate to the **Offers** view and click **Create**.
2. Select workspace.
3. Add name.
4. Add your offer URL and add macros if needed. Usually you need to map Skro Click ID macro for same specific parameter name to use postback for conversions.
5. Click **Save & Close**.
### Create a campaign [#create-a-campaign]
1. Go to **Ads Manager** and click **Create**.
2. Select your integrated **Traffic Source** as TikTok.
3. Select your **Conversion Event Name**. That is needed to send conversion info back to TikTok.
4. Select your **Conversion Pixel**. That is needed to send conversion info back to TikTok.
5. Cost Model should be **Auto**.
6. Select your cost currency.
7. Click **Next**

8. Select workspace.
9. Add name to your campaign.
10. Click **Next**

11. Choose your **Destination Type**. In this example we use **flow**
12. Choose your redirect mode. In this example we use **redirect 302**
13. Select your landing.
14. Select your offer(s).
15. Click **Save**

### REDIRECT tracking method - Landing and Offers [#redirect-tracking-method---landing-and-offers]
1. Choose **Redirect** tracking method.
2. Copy your campaign tracking link into clipboard.
```text
https://mytrackingdomain/campaign/91bf83a6-1153-4cab-a659-vf3232323232?ttclid=__CLICKID__&ad_id=__CID__&ad_group_id=__AID__&campaign_id=__CAMPAIGN_ID__&ad_name=__CID_NAME__&ad_group_name=__AID_NAME__&campaign_name=__CAMPAIGN_NAME__&placement=__PLACEMENT__
```
4. Make sure you have **Click To Offer** link correctly set on your landing page. This link will redirect your user to your offer page. Tracking domain must be same on your Skro campaign link and on your CTA link.
Make sure you have set up Skro Click ID macro on your offer url for conversion tracking.
### DIRECT tracking method - Only Offer [#direct-tracking-method---only-offer]
1. Choose **Direct** tracking method and select your offer page.
2. Copy your tracking link into clipboard.
```text
https://mytrackingdomain?trck=eyJjcGlkIjoiMzBhNWFhMGQtNjU4YS00ZWY2LWFhOTEtMDQ5YzUxNzQ5MDlhIiwiciI6MCwicCI6MCwibyI6MH0=&ttclid=__CLICKID__&ad_id=__CID__&ad_group_id=__AID__&campaign_id=__CAMPAIGN_ID__&ad_name=__CID_NAME__&ad_group_name=__AID_NAME__&campaign_name=__CAMPAIGN_NAME__&placement=__PLACEMENT__
```
3. Copy and paste Skro **Tracking Pixel** to your website between HEAD tags.
4. Copy and paste Skro **Thank You page JS pixel** to your website after successful payment or registration.
### DIRECT tracking method - Landing and Offers [#direct-tracking-method---landing-and-offers]
1. Choose **Direct** tracking method and select your landing page.
2. Copy your tracking link into clipboard.
```text
https://mytrackingdomain?trck=eyJjcGlkIjoiMzBhNWFhMGQtNjU4YS00ZWY2LWFhOTEtMDQ5YzUxNzQ5MDlhIiwiciI6MCwicCI6MCwibyI6MH0=&ttclid=__CLICKID__&ad_id=__CID__&ad_group_id=__AID__&campaign_id=__CAMPAIGN_ID__&ad_name=__CID_NAME__&ad_group_name=__AID_NAME__&campaign_name=__CAMPAIGN_NAME__&placement=__PLACEMENT__
```
3. Copy and paste Skro **Tracking Pixel** to your website between HEAD tags.
4. Make sure you have **Click To Offer** link correctly set on your landing page. This link will redirect your user to your offer page.
Make sure you have set up Skro Click ID macro on your offer url for conversion tracking.
## Step 5. Create a Campaign in TikTok [#step-5-create-a-campaign-in-tiktok]
There are multiple campaign types that you can create with TikTok. Campaign types determine how your ad will be promoted.
In order to create a TikTok ad campaign, please follow the steps below:
1. Sign in to your TikTok ads manager account.
2. Create a new campaign.
3. Select your campaign type, tracking event, pixel, audience, placements, budget etc.

**Example**:
4. The complete **Redirect** tracking URL that you have copied from Skro should look like this:
```text
https://mytrackingdomain/campaign/91bf83a6-1153-4cab-a659-vf3232323232?ttclid=__CLICKID__&ad_id=__CID__&ad_group_id=__AID__&campaign_id=__CAMPAIGN_ID__&ad_name=__CID_NAME__&ad_group_name=__AID_NAME__&campaign_name=__CAMPAIGN_NAME__&placement=__PLACEMENT__
```
5. On the ad level you have to provide your tracking link.

6. Click **Publish** when you are done.
Congratulations, you have successfully set up tracking of TikTok traffic with Skro. Each time a visitor clicks on your ad, will be directed to your landing page with Skro's tracking parameters being passed. On a landing page, the direct tracking script will launch and send an HTTPS request to Skro with information about a visit and other information passed from TikTok.
## Step 6. Additional Conversion API Parameters [#step-6-additional-conversion-api-parameters]
**Requirements:** TikTok Ad Account and Conversion API Integration.
If you need to send additional information via TikTok Conversion API, then you can use the following parameters:
- **sourceDomain** - It is used if you want to hide your real source domain. By default it is used your landing or offer domain as source domain and this info is sent back to TikTok.
- **eventId** - You can send your Event ID if you want to avoid duplication. For example, if you are using TikTok JS Pixel and Conversion API together and both fires the same event.
## Verify the setup [#verify-the-setup]
Open the generated campaign URL and check that the visit appears in Skro. Confirm that traffic source macros resolve to actual values. If you send conversions back to the source, verify a test conversion in both systems.
If data is missing, check the selected workspace, integration, campaign, and reporting date range. Compare parameter names and macro values with the examples in this guide before repeating the test.
## Related guides [#related-guides]